Saturday, March 28, 2009

Cinnamon Rolls = love

gluten free cinnamon rollsphoto courtesy of my sister Suzy
the small picture doesn't do it justice-
click on it to see the larger view
and soak in the cinnamon sugary goodness


Something made me want cinnamon rolls. And I am SO glad I made these. They're fantastic. Way better than any other recipe I've tried. I never thought of using brown sugar in the filling, and it makes them so gooey and yummy. I used a smallish pan so they aren't as spread out as they normally would be, but I've already had two...

It's Roben Ryberg's recipe from The Gluten Free Kitchen, except I used 1/3 c. millet flour and 2/3 c. corn starch instead of 1 c. corn starch. I've made several things using that book, and I recommend it. My only issue is that the recipes use mainly starches, but you can experiment and substitute with more healthy flours. The recipes themselves are pretty solid.

You can find this recipe in the book or over at I am Gluten Free.

The rest of the pan is calling me... must resist!

Fiesta Soft Tacos

gluten free soft tacos
I had a tomato that had gotten a little old so its skin was a little tough, but it was still good. Not wanting to waste it, I thought about the leftover bell pepper and onion from the etouffee, the can of chiles and black beans in my pantry, the corn tortillas on the counter, and the ground beef and corn in my freezer. It was so obvious- I had to make tacos.

Tacos are my favorite. They're super easy to make, and there are so many ways to make them. You just pretty much put in what you have and it's always good.

Here we go:

Chop up your veggies: 1/4 c. (or to taste) each of green bell pepper, onion and tomato. If your chiles aren't already chopped, do those too. I used a little less than 1/4 c.

Look at how pretty the veggies are


Take a piece of ground beef about the size of your hand/ palm and season it with 1 to 1 1/2 t. taco seasoning*. Cook that in a pan until it's looking about halfway done. At that point, put in the bell pepper and onion and let them cook to soften them up a bit.

When the meat is brown and looks done, throw in 1/2 c. corn, 1/2 c. black beans, the chiles and the tomatoes. Let it all get warm for about 5 minutes while you soften the tortillas.

Softening tortillas has always been an issue for me- until today! Microwaving is not good, because no matter what I try they're warm and pliable straight out of it, but halfway through eating my taco it starts to fall apart. I've even tried wrapping a damp paper towel around it but that makes it sticky and crumbly- at the same time! I wish I had a gas stove to get those nice toasted parts, but I don't.

So. What I do is turn a burner on my electric stove up high and put a piece of tin foil over it. I spray that with cooking spray (absolutely necessary!) and put my tortilla on it. A few seconds on each side gives me a soft, warm tortilla that stays that way. Awesome.

Anyway, when the taco stuff is all warm and yummy, put it in your tacos with some sour cream and eat away.

These amounts will give you enough for appx 6 tacos.

*Taco Seasoning:
I keep a mix on hand. I use equal parts of salt, ground cumin, chili powder, coriander, and garlic powder, 1/2 part oregano, and 1/4 part sugar and pepper. I shake it up in a small container and keep it until I need it- which is kind of a lot :o)

Wednesday, March 25, 2009

Etouffee!

Oh yum. This hit the spot. Like Mardi Gras in my mouth.

I found this recipe in a Cajun cookbook that was lying around my house, only I have no idea where it went to tell you which one it was.

*DISCLAIMER: I know I told some of you that I'd have you over for etouffee this week, but I wanted to try this recipe first to make sure it didn't suck before I served it to a bunch of people. It has been approved.

The etouffee in my picture is not as thick as it should be. I must have messed up somewhere when I was trying to quarter the recipe. What it lacks in thickness, it sure makes up for in taste. Holy cow, this was good. So good it even made me slow down and savor every bite.

Get some ingredients and make this.

Etouffee

1 stick butter
1/2 c. chopped celery
1 c. chopped onion
1/2 c. chopped green bell pepper
1/2 c. chopped green onion
1/4 c. parsley
2 c. water
1 t. salt (My shrimp was pre-cooked and was packaged with salt, which I realized when I tasted it and it was a smidge salty- check and see. I remedied it by sticking a some small chunks of potato in there for a while.)
1/2 t. cayenne pepper (I added more for a kick)
1/4 t. black pepper
1 1/2 - 2 lb seafood (fresh or pre-cooked and frozen. Crawfish is best- Shrimp is good too.)
2 t. corn starch

If you're using frozen seafood, take it out to thaw- and toss one down to your frantic-looking cat who has come over to investigate what's going on in the kitchen and smelled seafood.

Melt the butter in a pot. Saute the veggies for a while until they're soft and the butter starts to brown.

Add 1 3/4 c. water and all of the other ingredients EXCEPT cornstarch into the pot. Boil that for 20 minutes, stirring often.

Mix the corn starch with the 1/4 c. water left over and mix that into the pot. Cook for 10-15 more minutes. Let it stand for 5 minutes. Makes ~ 6 servings, depending on your appetite.

Serve it hot over rice and think of New Orleans and zydeco music.

Saturday, March 21, 2009

chocolate cupcakes

gluten free chocolate cupcakes
Please ignore the awful, hastily-taken picture. This recipe transforms beautifully into cupcakes. I found it somewhere on the internet, so if you came up with it, let me know so I can give credit!

Some things you should know:

When making the batter, it may seem as if the ingredients aren't mixing. Just keep the heat on low and keep stirring- they will come together.

I routinely give my cupcake liners a little spritz of cooking spray to keep the liner from sticking to the cake, but don't do that here or they will be greasy on the bottom.

The batter will be very runny. I use a ladle to fill the cupcakes.

Bake the cupcakes at 350 for 12-15 minutes. Test with a toothpick because the tops will still look wet when they are done.

This makes a very soft cake. Very yummy. Make sure they are cooled completely before frosting.

The recipe makes 2 dozen cupcakes, or 1 dozen if it is halved.

Saturday, March 14, 2009

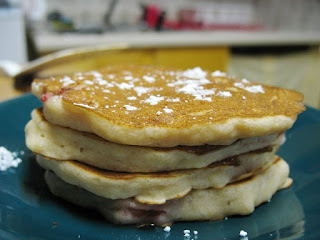
Strawberry Pancakes

gluten free strawberry pancakes
I've tried a lot of bad gluten free pancakes.

But today, this dreary, cold and rainy day, I am feasting on pancakes that taste like pancakes. PLUS strawberries. How could you go wrong?

This recipe adds strawberry preserves to give the pancakes a uniform strawberry taste in addition to the pieces of fruit. I think they're sweet enough to not need syrup, but they're not so sweet they give you a sugar rush first thing in the morning.

Strawberry Pancakes

1 c. flour mix
1 T. sugar
3/4 t. baking powder
shake of salt
1/3 c. fresh/frozen fruit, chopped and sweetened to taste
1 beaten egg
2 T. oil (I used extra virgin olive oil because that's all I had- it worked great)
1 T. strawberry preserves
3/4 c. milk

Preheat your griddle/ pan to medium-medium high. It's ready when you sprinkle water on it and the drops dance around for a few seconds before disappearing. I keep my griddle a little lower than I'd use for regular pancakes. I've found gluten free pancakes need to cook a tad bit longer and if the griddle's hotter, they burn before they're cooked.

Mix the dry ingredients and set aside. Mix the wet ingredients except for the fruit. Mix them all together with a whisk. You can mix the heck out of these; no worries about tough pancakes because there is no gluten!

If you're not using a non-stick pan, grease it up. Using a ladle or 1/4 c. measuring cup, scoop some batter onto the pan. Spread it around a little to ensure that the pancake is not too thick. You want to see a couple bubbles coming up in the interior of the pancake or the middle won't get done. When the pancake looks set enough to flip it, flip it and let it cook a few minutes.

Dust hot pancakes with powdered sugar... and savor them. Also, try this basic gluten free pancake.

Friday, March 6, 2009

Comfort Cookies

gluten free peanut butter nutella cookies
Peanut butter cookies = comfort. After this long, trying week, I sure needed some comfort. Is it bad that I look for it in food? Not at all.

I wanted something peanut buttery, but with a little extra oomph. Chocolately. Soft. Rich. The Nutella in my pantry suddenly called my name. And Comfort Cookies were born.

1/2 c. shortening
1/2 c. peanut butter
1/2 c. sugar
1/2 c. brown sugar
1 egg
1 heaping cup GF flour mix
1 t. baking powder
1/8 t. salt

Mix the dry ingredients. In a separate bowl, cream the butters and sugars. Mix in the egg, then mix in the dry ingredients. I mix the dry ingredients in with a spoon instead of the hand mixer. Refrigerate or stick the dough in the freezer until the dough is cold.

Roll the dough into smallish balls, then place them on a greased cookie sheet. Poke each ball with your finger to form a well. Fill it with Nutella. Mmm. If you're making these for guests, use a pastry bag to make a pretty little dollup. A spoon and your finger works just as well, though.

Bake these cookies in a 375 degree oven for about 10 minutes, or until they are set and just starting to brown on the edges. Let them cool on the pan for a minute, then place them on a cooling rack.

You can also spread nutella on top of these, like you would a frosting.

Eat half a dozen. Be comforted.

Sunday, March 1, 2009

Molasses Cookies

gluten free molasses cookiesI got a nice package of extra items from Jen's pantry today, and included was a jar of molasses that said Gluten Free right on the bottle. Woot woot. It seems like I've been getting a lot of hand-me-downs lately, haha.

I was intrigued. I've never had molasses before. I opened the jar and smelled it... and was kind of grossed out. It reminded me of soy sauce, and smelled a little sour. Perhaps it had gone bad? A little research told me that it was just the way it smells. Onward.

The only way I thought to use molasses was in cookies... so here we go. This recipe doesn't make a very "gingersnap" type of cookie; molasses is the main flavor as opposed to ginger.
You can drop the molasses down to 1/3 cup and raise the ginger up to 1 1/2- 2 t. to amplify the gingersnap flavor.

When you bake these they give the house a heavenly, cozy aroma. Mmm.

Molasses Cookies

1/2 c. butter/shortening
1/2 c. brown sugar
1/4 c. sugar
1/2 c. molasses
1 egg
2 c. flour mix (contains xanthan gum)
1 1/2 t. baking soda
1/8 t. salt
1 t. cinnamon
1 t. ginger
1/8 t. nutmeg

Cream the butter & sugar. Add in the egg and molasses. Mix the dry ingredients, then mix everything together.
You have to refrigerate the dough or they will spread a lot.

I've had this problem a lot with cookies- I dunno what the deal is. Even when I barely cream the butter and sugar, and even when I use shortening instead of butter, they spread. The only solution I've found is refrigeration.

Anyway, coat teaspoonfuls of cold dough in sugar and bake at 350 for approximately 10 minutes. For softer, chewier cookies, watch them until the middle is set, and for crispier cookies leave them in a few more minutes. I made about half crispy and half chewy- both are awesome.

This makes about 2 dozen cookies